I continue a series of blog posts about implementing WPF
concepts outside of WPF.
Even though, the purpose of these articles is to show how to implement
and use WPF concepts outside of WPF, WPF and XAML application are still the major beneficiaries of
this new approach which will allow to e.g. create bindings between properties on the non-visual View Models
or extend the non-visual View Models (by using AProperties) without modifying the View Model code.
Because of this, it makes sense to create a XAML markup extension for the non-WFP binding
described in Composite Path Bindings outside of WPF. This article talks about creating and using such markup extension.
The source code for this blog post is located under
BindMarkupExtensionCode.zip link.
Bind Extension
To distinguish the new markup extension from WPF’s Binding markup extension, we’ll call it Bind
or BindExtension.
BindExtension class is located under NP.Paradigms.Windows project. It extends
System.Windows.Markup.MarkupExtension class. It has the following public properties that can be
set in XAML:
Source– allows to specify the binding source object. IfSourceproperty is not
specified, we are trying to figure out the source object from other properties e.g.
SourceElementNamedescribed below. If nothing helps, the source object is assumed to be the same
as the target object (we still have no notion similar to theDataContextin WPF bindings).SourceElementName– is similar toElementNameof WPF binding. It allows to specify a
named XAML element to serve as theBinding‘s source.SourcePath– a string that specifies the path of the binding relative to the binding’s
Sourceobject.
The path links are separated by periods (‘.’). The plain properties are specified as strings. The WPF attached
or dependency properties are placed within parentheses. TheAPropertiesare placed within two
asterisks. Here is a composite path sample:MyPlainProp.(this:MyAttachedProps.MyTestAttachedProp).*this:MyTestAProps.MyTestAProp*. This path is looks forAPropertyMyTestAProps.MyTestAPropwithin
an object defined by an attached propertyMyAttachedProps.MyTestAttachedPropwithin an object
define by a plain propertyMyPlainPropof the source object of the binding. Both attached property
andAPropertyare defined within the current project specified by XAML prefix “this:”.TargetPath– a string that specifies the path to the target of the binding
with respect to the target binding object and the target property. Unlike the WPF binding
our composite path binding allows to specify a composite target path (see Composite Path Bindings outside of WPF). The first link or the
target path will always be the target property defined within XAML. The subsequent links can be
defined byTargetPathstring. Here is a XAML example
<Grid DataContext={Bind TargetPath="MyProp"...}. This example will not set the
DataContextproperty on the grid. Instead it will useDataContextproperty as the first link
in the target binding and will modifyDataContext.MyPropproperty instead (if it exists, of course).
IfTargetPathis not specified, the XAML target property will be modified.TheBindType– similar to WPF binding’sMode. Here are the possible valuesOneWay– binding from source to target propertyOneWayReverse– binding from target to source property (similar to WPF’sOneWayToSource)TwoWay– binds source and target properties together so that when one of them changes, the other changes also. The initial value is set from source to target.TwoWayReverseInit– binds source and target properties together so that when one of them changes, the other changes also. The initial value is set from target to source.
Usage Samples
Project XamlBindingTests shows how to use the BindExtension in XAML. The relevant XAML code is located within
MainWindow.xaml file. Here is how the test application looks:
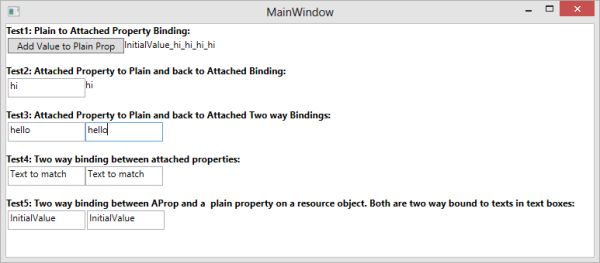
Test1 demonstrates attaching plain property to dependency property using Bind extension.
Text property of a TextBlock is bound to MyTestProp property
of a resource object MyTestDataObj_Test1:
<TextBlock Text="{winparadigms:Bind Source={StaticResource MyTestDataObj_Test1},
                                    SourcePath=MyTestProp}"
           Grid.Column="1"/>
When a button “Add Value to Plain Prop” is clicked the property of the resource object is added “_hi” at the end and the binding
transfers the corresponding change to the Text property of the TextBlock object.
Test2 shows how to set the binding in both directions – from a Text property on
TextBox to a resource object and
from the resource object to the Text property on a TextBlock:
<TextBox Width="100"
          Height="25"
          Text="{winparadigms:Bind Source={StaticResource MyTestDataObj_Test2},
                                 SourcePath=MyTestProp,
                                 TheBindType=OneWayReverse}"/>

<TextBlock Text="{winparadigms:Bind Source={StaticResource MyTestDataObj_Test2},
                                    SourcePath=MyTestProp}"
           Grid.Column="1" />
When you start typing
in the TextBox the TextBlock text shows next to it.
Test3 demos a two TwoWay bindings – one from a TextBox to a resource object and
the other from the same resource object back to a different text box.
The two text boxes are thus bound in both directions via a resource object:
<TextBox Width="100"
            Height="25"
            Text="{winparadigms:Bind Source={StaticResource MyTestDataObj_Test3},
                                    SourcePath=MyTestProp,
                                    TheBindType=TwoWayReverseInit}" />

<TextBox Width="100"
          Height="25"
          Text="{winparadigms:Bind Source={StaticResource MyTestDataObj_Test3},
                                 SourcePath=MyTestProp,
                                 TheBindType=TwoWay}"
          Grid.Column="1" />
Test4 shows how to use SourceElementName to bind Text properties in
two TextBox objects:
<TextBox Width="100"
            Height="25"
            Text="{winparadigms:Bind SourceElementName=TextBoxToMatch,
                                    SourcePath=(TextBox.Text),
                                    TheBindType=TwoWay}" />
<TextBox Width="100"
          Height="25"
          x:Name="TextBoxToMatch"
          Text="Text to match"
          Grid.Column="1" />
Finally Test5 shows how to bind an AProperty. The AProperty
this:MyAProps.MyTestAProp is defined on the
resource object MyTestDataObj_Test5. It is bound to its own plain property MyTestProp:
<this:MyTestData x:Key="MyTestDataObj_Test5"
                  this:MyAProps.MyTestAProp="{winparadigms:Bind SourcePath=MyTestProp, TheBindType=TwoWay}"
                  MyTestProp="InitialValue" />
Also one TextBox of Test5 binds its Text to the plain MyTestProp
of the resource object MyTestDataObj_Test5, while the other TextBox of the test
binds to the AProperty:
<TextBox Width="100"
         Height="25"
         Text="{winparadigms:Bind Source={StaticResource MyTestDataObj_Test5},
                                  SourcePath=MyTestProp,
                                  TheBindType=TwoWay}" />
<TextBox Width="100"
         Height="25"
         Text="{winparadigms:Bind Source={StaticResource MyTestDataObj_Test5},
                                  SourcePath=*this:MyAProps.MyTestAProp*,
                                  TheBindType=TwoWay}"
         Grid.Column="2" />
Thus the two TextBoxes are bound together via a plain property and an AProperty on a resource object.

Leave a comment