Here are the notes from Exchanging Software Design Knowledge group meetup on Apr 11, 2018: Multiple Implementation Inheritance and Roxy Code Generation
Exchanging Software Design Knowledge Meetup 03/13/2018 notes
March 14, 2018Here are the notes from Exchanging Software Design Knowledge group meetup Pluggin Based Patterns on 03/13/2018
Event Bindings outside of WPF
June 8, 2014Event Bindings outside of WPF
Code Location
The code for this blog post can be downloaded from EventBindingTests.zip.
The solution file EventBindingTests.sln is located under EventBindingTests\TESTS\EventBindingTests
folder.
Introduction
Here I continue a series of blog posts about implementing WPF concepts outside of WPF.
In fact here, I am going to describe a concept/pattern that does not exist in WPF but, based on
my experience will be useful in WPF-esq universe – the Event Binding.
WPF creates various hierarchies of objects – there is a logical tree, there is a visual tree. When programming
MVVM there is also unspoken, but widely used hierarchy of the view models – e.g. a top level View Model might
contain some member representing another View Model or it might contain a collection of the view models representiong e.g. rows in a table or entries in a ListView.
Many time there should be an action from a sub-View Model to the one of its ‘anscestors’ in the View Model
hierarchy. This might happen, e.g. when a visual action is invoked on the sub-View Model but should result in
a change on its ‘anscestor’ level. The simplest example would be a remove button on each of the items within a list view. If implemented view the View Model patters, the remove button will have access only to the sub-View Model corresponding to individual item. However, the remove action should happen on the collection that contains the items’ View Models, i.e. a level higher. The way to implement it would be to create a ‘remove action’ event that fires at the item View Model level. When item becomes part of the collection in the higher level View Model – it adds a handler to the event that actually removes the item. The higher level View Model needs to manage adding and removing handlers to the items as they are added or removed to or from the collection or as the collection of items is getting totally overriden by a different collection.
The purpose of the Event Binding is precisely to make it easier to
manage the event handlers added at the ‘anscestor’ level to the ‘descendant’ item events.
Demonstration of what one can do with Event Binding
The main program is in Programs.cs file of EventBindingTests project. It demonstrates
binding an event handler to a single object or to a collection of objects.
Single Object Event Binding
Here is the single object event binding code (do not try to read to much into it since it is explained step by step below:
PopulatedOrganization wonkaFactory = new PopulatedOrganization();

Organization chocolateDepartment = new Organization();

#region SINGLE OBJECT EVENT BINDING

// create the event binding for single object
EventBinding<Organization, string> eventBinding =
    new EventBinding<Organization, string>();

// specify the source object and the path to the source binding property that contains the event
// we want to bind to
eventBinding.SourceObj = wonkaFactory;
eventBinding.SourcePathLinks =
     StringCodePathResolver.ResolveStringPath("TheMostImportantDepartment").ToList();

// do the binding itself
eventBinding.Bind();

// specify the event name (it can be done either before or after bind()
// method is called
eventBinding.EventName = "SomethingHappenedInOrgEvent";

// add the event hanlder whose signature is similar to that of
// SomethingHappenedInOrgEvent event to the binding
eventBinding.TheEvent += eventBinding_SomethingHappenedInTheDepartment;

// nothing is printed to the console because wonkaFactory.TheMostImportantDepartment
// is still not set to chocolateDepartment object
chocolateDepartment.FireSomethingHappenedEvent("Augustus Gloop went to the chocolate creek. (Before the department added - should not show)" );

// set wonkaFactory.TheMostImportantDepartment
wonkaFactory.TheMostImportantDepartment = chocolateDepartment;

// this message is printed on the console
chocolateDepartment.FireSomethingHappenedEvent("Augustus Gloop is out of the game (should show)");

// unbind the event
eventBinding.Unbind();

#endregion SINGLE OBJECT EVENT BINDING
Here is the description of what is going on in the code. Organization class
has a property TheMostImportantDepartment which is also of Organization type.
Organization also has an event SomethingHappenedInOrgEvent.
This event is of the type SomethingHappenedDelegate which is similar to
Action<string>. Method FireSomethingHappenedEvent(string message)
fires the event passing the message to it.
We want to bind the SomethingHappenedInOrgEvent on the TheMostImportantDepartment
property of the organization to a handler at the main program level. For this purpose we use the Event Binding:
// create the event binding for single object
EventBinding<Organization, string> eventBinding =
    new EventBinding<Organization, string>();

// specify the source object and the path to the source binding property that contains the event
// we want to bind to
eventBinding.SourceObj = wonkaFactory;
eventBinding.SourcePathLinks =
     StringCodePathResolver.ResolveStringPath("TheMostImportantDepartment").ToList();

// do the binding itself
eventBinding.Bind();

// specify the event name (it can be done either before or after bind()
// method is called
eventBinding.EventName = "SomethingHappenedInOrgEvent";
The above code does the binding. Note that the binding is already there even though the
TheMostImportantDepartment property has not been set yet.
Now we add the event handler to the Event Binding
and not to the original event:
// add the event handler whose signature is similar to that of
// SomethingHappenedInOrgEvent event to the binding
eventBinding.TheEvent += eventBinding_SomethingHappenedInTheDepartment;
This event handler will simply print the message argument from the event.
Now if we try to fire the event on the chocolateDepartment object – nothing should
change, because TheMostImportantDepartment property of the wonkaFactory
object is still not set to the chocolateFactory:
// nothing is printed to the console because wonkaFactory.TheMostImportantDepartment
// is still not set to chocolateDepartment object
chocolateDepartment.FireSomethingHappenedEvent("Augustus Gloop went to the chocolate creek. (Before the department added - should not show)" )
Now we set the property and fire an event again and the corresponding message should be printed on the console:
// this message is printed on the console
chocolateDepartment.FireSomethingHappenedEvent("Augustus Gloop is out of the game (should show)");
Note that the Event Binding takes full care of figuring out if
the property is null or not and making the event binding behave accordingly as long as the binding notification
is on (for simple properties – that means firing INotifyPropertyChanged.PropertyChanged
event when the TheMostImportantDepartment property changes. Similar notifications
are available for AProperties or Attached/Dependency properties – but the
SourcePathLinks will have to reflect the corresponding PropertyKind.
Note also that the even though we considered a path containing only one path link – we can
use arbitraty path links of arbitrary length for Event Bindings
as long as each link provides binding notifications.
Collection Event Binding
Collection Event Binding provides even more dramatic refactoring.
Not only it takes case of collection being reset, but also if the collection implmements
INotifyCollectionChanged interface (i.e. ObservableCollection,
it adds or removes proper handlers when the items of the
collection are added or removed correspondingly.
An organization has AllDepartments property of type
ObservableCollection<Organization>. We want to set the collection, add a couple of departments
to it use Event Binding to bind the SomethingHappenedInOrgEvent
on the collection objects to our event handler. Here is the corresponding code:
#region COLLECTION EVENT BINDING

// create the collection AllDepartments
wonkaFactory.AllDepartments = new ObservableCollection();

// add chocolate department to it
wonkaFactory.AllDepartments.Add(chocolateDepartment);

// create collection event binding
CollectionEventBinding<Organization, string> collectionEventBinding =
    new CollectionEventBinding<Organization, string>();

// set the objects that contain the event we want to bind to
// to be "AllDepartments" collection property of "wonkaFactory" object
collectionEventBinding.SourceObj = wonkaFactory;
collectionEventBinding.SourcePathLinks =
     StringCodePathResolver.ResolveStringPath("AllDepartments").ToList();

// bind the event
collectionEventBinding.Bind();

// set the event name (can be done before or after the binding)
collectionEventBinding.EventName = "SomethingHappenedInOrgEvent";

// add event handler
collectionEventBinding.TheEvent += collectionEventBinding_TheEvent;

// create gumDepartment
Organization gumDepartment = new Organization();

// fire an event (should not be handled since gumDepartment is not part of the collection yet)
gumDepartment.FireSomethingHappenedEvent("We had great sales (Before the department is added - should not show)");

// Add gum department to the collection
wonkaFactory.AllDepartments.Add(gumDepartment);

// fire the event (should be handled, since now gumDepartment is part of the collection)
gumDepartment.FireSomethingHappenedEvent("We had great sales (After the department is added - should show)");

// remove gum department from All Department collection
// collectionEventBinding should be sufficiently smart to disconnect
// the event of gumDepartment object from the handler
wonkaFactory.AllDepartments.Remove(gumDepartment);

// fire the event again - (the handler should not run, since gumDepartment has been removed from the collection)
gumDepartment.FireSomethingHappenedEvent("We had great sales (After the department is Removed - should not show)");

#endregion COLLECTION EVENT BINDING
The binding code is sufficiently similar to the case of a single object so that we do go
over each step again in detail. I’d like to re-iterate, however, that the CollectionEventBinding
will manage the event handlers on each of the members of the collection both in case the whole collection
is re-assigned (if all the path links to the collection have binding notifications)
or in case elements are added or removed to or from it (if the collection implements
INotifyCollectionChanged interface).
Implementation Notes
The central class for both EventBinding and CollectionEventBinding implementation
is NP.Paradigms.EventBindingBase<ObjectType, EventObjectType>. It provided the actual binding
from the actual object in the hierarchy to the Event Binding‘s property
TheObj. This class has two generic parameters: ObjectType and EventObjectType.
ObjectType is the type of the object that we bind to – in case of a single event binding – it is the
same as the type of the object that contains the event (EventObjectType), while in case of a collection
event binding it is a collection of objects of type EventObjectType.
This class contains two important abstract methods
Disconnect() and Reconnect() that control removing or setting the event handler
on the corresponding object(s). These methods are overriden in concrete implementation of EventBinding
and CollectionEventBinding functionality.
This class defines also the name of the method that will be attached to the bound object(s) events: "EventHadler".
This method is also defined in the sub-classes.
The reflection based actual implementation of adding and removing the handlers to the object is located
within NP.Paradigms.EventManager class.
Class SingleObjectEventBindingBase is derived from EventBindingBase it overrides
Disconnect() and Reconnect() methods to act on a single object.
A number of EventBinding classes with various generic parameters specifying different possible
arguments to the event is derived from SingleObjectEventBindingBase class.
CollectionEventBindingBase class is also derived from EventBindingBase by overriding the same
functions Disconnect() and Reconnect() and specifying some handling when items are added or removed
to or from the collection.
A number of CollectionEventBinding classes with various generic parameters is also derived
from CollectionEventBindingBase class.
Conclusion
In this blog post I describe a new concept of Event Binding which is not part
of WPF but should come handy for programming using WPF related concepts (whether it used in WPF or outside of WPF).
Data Templates Implementation Outside of WPF
May 28, 2014Data Templates Implementation Outside of WPF
Code Location
The code for this blog post can be downloaded from
NonWPFDataTemplatesTests.zip.
Introduction
Here I continue a series of blog posts regarding implementing WPF
concepts outside of WPF.
WPF is built around a hierarchy of visual objects the so called
Visual Tree. Any WPF control can provide an example of such hierarchy –
e.g. a WPF window might contain a grid panel which in turn contains
a number of visual objects e.g. buttons and list boxes which in turn contain
some text etc.
The object hierarchy is usually built in XAML with the help of numerous
techniques such as bindings, Control Templates and Data Templates.
Data Templates with the help of bindings
allow to translate some non-visual objects into visual objects with the
hierarchy defined by XAML. These resulting visual objects usually mimic the behaviors of the original non-visual objects – e.g. Changing a property on a
non-visual object would result in the corresponding visual property change,
adding or removing an object to or from an observable collection would result
in a corresponding item being added or removed from e.g. a ListView.
This blog entry will show how to use concepts similar to WPF Data Templates
outside of WPF and apply them for creating in XAML purely non-visual objects.
I’d like to stipulate that the utility of the concepts introduced
here might not be quite obvious yet. The usage of non-visual data templates
will be explained in the future blog posts.
Also I would like to express gratitude to the WPF re-implementation attempt
called Avalonia. It would have taken me much longer to understand the inner workings of XAML
functionality without this project and also I am using a modified version of several of its classes: AvalonXamlReader, ContentLoader and TemplateContent in order to create the
non-visual Data Templates.
Data Hierarchy Code Description
Data Hierarchy
First of all let me describe the non-visual hierarchy that we
want to build.
The WPF’s visual hierarchy is based on the natural containment of visual objects. As was stated above a window might contain a panel – a panel further might contain other panels and controls etc.
The non-visual hierarchy that we deal with is Property Map and the classes
that represent that hierarchy are contained under NP.Paradigms.DataHierarchy project. In a sense it mimics the data hierarchy within JSON code: there are Fields, Property Maps, and Collections.
A Field would only contain a value of type object.
A Property Map corresponds to a C# object –
it has a number of named properties each has a value. The values can be plain Fields, other Property Maps or Collections. The name of a property is unique within the map object. I implemented such maps as a Dictionary with string keys
corresponding to the name of the property and values – the property value. In JSON such object would be shown within curly brackets:
{

   name1 : value1,

   name2 : value2

}
Collection is a collection of objects (usually of similar structure) that can be either Property Maps or Fields. In JSON collections are denoted by square brackets:
[

   value1,

   value2

]
Clearly our Data Hierarchy can be used to represent a very wide range of models – in particular anything that can be represented by JSON or C# classes and collections can be represented by the Data Hierarchy.
Classes Describing the Data Hierarchy
As was mentioned above all the classes describing our Data Hierarchy model are locate under NP.Paradigms.DataHierarchy project.
All the Data Hierarchy classes implement IPresentationTreeNode interface. This interface has Parent property that points from the current object to its parent within the Data Hierarchy. IPresentationTreeNode also extends IDataContextContainer interface that defines DataContext property that all the members of the hierarchy should implement. Just like in WPF, the DataContext property contains the data object from which the member of the hierarchy gets its values via binding.
There is also IPresentationTreeNodeWithChildren<T> interface that extends IDataContextContainer and in addition also defines a collection Children.
FieldPresenter class corresponds to a single value Data Hierarchy node. Its property TheValue contains the corresponding value. Its subclass TextFieldPresenter also allows formatting the values for text presentation.
CollectionPresenter defines a collection within Data Hierarchy by its property Children.
PropertyMapPresenter represents the Property Map nodes within Data Hierarchy. It implements IDictionary so that one can use the indexer notations (square brackets) to define the name-value mappings, e.g:
myMap["Name"] = value
Note that classes that implement Data Hierarchy nodes fire PropertyChanged events when their properties change. Also Children property of the CollectionPresenter is implemented as ObservableCollection and correspondingly fired CollectionChanged event when the items are changed within the collection (removed, added or moved). This is necessary so that the bindings that have the Data Hierarchy nodes as source would work.
Classes for XAML Composition using Data Templates
Classes used for XAML composition are also defined under NP.Paradigms.DataHierarchy project.
DHierarchyContentControl and DHierarchyItemsControl correspond to the WPF’s ContentControl and ItemsControl classes.
DHierarchyContentControl defines properties Content and ContentTemplate.
ContentTemplate defines the sub-hierarchy of the node while Content property allows to switch the data context of its sub-nodes.
DHierarchyItemsControl defines properties ItemsSource and ItemTemplate. ItemsSource should be bound to a collection of objects. ItemTemplate specified the structure of each of the sub-nodes within DHierarchyItemsControl‘s Children collection. The resulting Children collection behaves similar to the ItemsSource collection if an item is added or removed from ItemsSource the corresponding item will be added or removed from the Children collection.
There is a number of classes for reading and processing XAML data templates. Class DHierarchyDataTemplate is used for storing the Data Hierarchy data templates within DHierarchyContentControl and DHierarchyItemsControl. DHierarchyTemplateContent together with DHierarchyContentLoader and AvalonXamlReader control loading the data templates from XAML.
Usage Code Description
Here we describe how the Data Hierarchy code with data template capabilities can be used.
The mock up data is contained under MockUpObjects. Here we consider only two classes: Organization and Person. Both are very simple Organization contains its name and a collection of people. Person simply contains first and last name of the person.
The main project in NonVisualDataTemplates. It defines an organization as its resource:
<MockUps:Organization x:Key="TheWonkaChocolateFactoryOrganization" />
Around the organization object it defines the Data Hierarchy data template. While on top of the Data Hierarchy data template it defines a visual representation (just in order to be able to see that it works).
Data Hierarchy representation is defined by the following templates:
<hierarchy:DHierarchyDataTemplate x:Key="EmployeeNonVisualDataTemplate">
    <hierarchy:PropertyMapPresenter>
        <hierarchy:FieldPresenter x:Key="FirstName"
                                  TheValue="{winparadigms:Bind SourcePath=FirstName,
                                                               SourceMode=DataContext}"/>
        <hierarchy:FieldPresenter x:Key="LastName"
                                  TheValue="{winparadigms:Bind SourcePath=LastName,
                                                               SourceMode=DataContext}"/>
    </hierarchy:PropertyMapPresenter>
</hierarchy:DHierarchyDataTemplate>
This template define the Data Hierarchy representation of a person (employee)
<hierarchy:DHierarchyDataTemplate x:Key="TheOrganizationTemplate">
    <hierarchy:PropertyMapPresenter>
        <hierarchy:FieldPresenter x:Key="OrgName"
                                  TheValue="{winparadigms:Bind SourcePath=OrgName,
                                                               SourceMode=DataContext}"/>
        <hierarchy:DHierarchyItemsControl x:Key="People"
                                          ItemsSource="{winparadigms:Bind SourcePath=People,
                                                                          SourceMode=DataContext}"
                                          ItemTemplate="{StaticResource EmployeeNonVisualDataTemplate}"/>
    </hierarchy:PropertyMapPresenter>
</hierarchy:DHierarchyDataTemplate>
This template defines the whole organization with multiple employees.
DHierarchyContentControl ‘marries’ the organization template and the organization data:
<hierarchy:DHierarchyContentControl ContentTemplate="{StaticResource TheOrganizationTemplate}"
                                       Content="{StaticResource TheWonkaChocolateFactoryOrganization}"
                                       x:Key="TheDHierarchyContentControl"/>
In order to visualize the results, a plain visual WPF hierarchy is build around the
DHierarchyContentControl:
<Grid Grid.Row="0"
      DataContext="{winparadigms:Bind Source={StaticResource TheDHierarchyContentControl}}">
    <Grid.RowDefinitions>
        <RowDefinition Height="Auto" />
        <RowDefinition Height="*" />
        <RowDefinition Height="Auto" />
    </Grid.RowDefinitions>

    <TextBlock Text="{winparadigms:Bind SourcePath=Child.-OrgName-.TheValue, SourceMode=DataContext}"
               Margin="10,0,0,0"/>

    <Border Grid.Row="1"
        BorderBrush="Black"
        BorderThickness="2"
        Margin="5">
        <ItemsControl ItemsSource="{winparadigms:Bind SourcePath=Child.-People-.Children, SourceMode=DataContext}">
            <ItemsControl.ItemTemplate>
                <DataTemplate>
                    <Grid>
                        <Grid.ColumnDefinitions>
                            <ColumnDefinition Width="Auto" />
                            <ColumnDefinition Width="Auto" />
                        </Grid.ColumnDefinitions>
                        <TextBlock Text="{winparadigms:Bind SourcePath=Child.-FirstName-.TheValue, SourceMode=DataContext}" />
                        <TextBlock Text="{winparadigms:Bind SourcePath=Child.-LastName-.TheValue, SourceMode=DataContext}"
                                   Grid.Column="1"
                                   Margin="20,0,0,0"/>
                    </Grid>
                </DataTemplate>
            </ItemsControl.ItemTemplate>
        </ItemsControl>
    </Border>
</Grid>
Note that we are using Bind markup extension instead of Binding. This extension has been described in some of the previous blog entries.
Also note that ‘-‘ character around a path link specifies that this path link is actually a key inside a Dictionary for the Bind markup extension. Also SourceMode=DataContext means
that we are binding to the DataContext property (by default Bind extension binds to
the object on which it is defined, not to its DataContext).
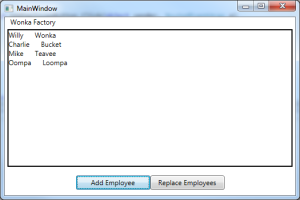
There are two buttons at the bottom of the application that allow to modify the original Organization object. The very simple for modifying the original Organization is located in MainWindow.xaml.cs code behind file. You can add an employee or you can replace its People collection with another collection. These changes will cause changes in Data Hierarchy representation and those in turn will cause the visual representation to change.
After running the application (and pressing a button to add an employee) you’ll see the following picture:
Conclusion
We’ve shown implementing XAML data templates for non-WPF (and even non-Visual) objects.
Attached and Routed Events outside of WPF
December 1, 2013Code Location
The code for this blog post can be downloaded from
AttachedRoutedEvents.zip.
Introduction
Here I continue a series of blog posts regarding implementing WPF
concepts outside of WPF.
In Attached Properties outside of WPF I introduced
a notion of AProperty – attached property implementation
outside of WPF. Unlike WPF attached property,
such property can be attached to any object –
not only to DependencyObject.
Just like AProperty can be added to an object
without modifying the object’s code, we can come up with the
REvent concept
similar to WPF’s attached event in order add an event to an
object without modifying the object’s code.
In Tree Structures and Navigation we were talking
about navigating a Tree from
node to node. The REvents can also be propagating
from node to node on a tree in a manner similar to that of
WPF’s RoutedEvents propagating on a visual tree.
Attached and Routed Events in WPF
Each event has 4 important actions associated with it:
- Defining an event
- Adding handlers to an Event
- Removing handlers from an Event
- Raising or Firing an Event from an object
In WPF and Silverlight one can use Attached Events –
events defined outside of an object in which they are being
raised. These Attached Events are
also called Routed Events for the
reason that we are going to explain shortly.
Here is how we define those 4 action above for attached WPF events.
- Unlike plain C# events, the Attached Events should
be defined outside of an object in a static class:public static RoutedEvent MyEvent=EventManager.RegisterRoutedEvent(...)
The Routed Event is associated with an object when it is being raised
from it. -
In order to add a handler to a Routed Event to an object,
the following code is employed:myObject.AddHandler(MyRoutedEvent, eventHandlerFunction, ...)The
myObjectshould always be aFrameworkElementin order to be able to
detect and handle an Routed Event. -
Removing a Routed Event is done in a similar fashion:
myObject.RemoveHandler(MyRoutedEvent, eventHandlerFunction) -
We can raise a Routed Event on a
FrameworkElement
object by using itsRaiseEventmethod:myObject.RaiseEvent(routedEventArgs)routedEventArgsshould contain a reference to the
static Routed Event object defined (registered)
asMyEvent, above.
These WPF Attached Events are also called Routed Events because they the handler for such event does not have to be defined on the same object on which
the event is raised or not even on an object that has a reference to an object on which such event is raised.
In fact Routed Event can propagate through the anscestor of object that raised such event within the Visual Tree that the object belongs to.
The Routed Events propagating up the Visual Tree (from the raising object to its anscestors) are called Bubbling events.
The Routed Events can also visit the anscestors first, starting from the
root node of the Visual Tree and ending the propagation at the
node that raised the Routed Event. Such events are called Tunneling events. Routed Events can also be neither
Bubbling nor Tunneling – in that case
they can only be handled on the object that raised them. Such events are called Direct event.
The routing behavior of an event (whether it is Bubbling, Tunneling or Direct is determined at the stage when the event is defined (registerd).
What we are Trying to Achieve
Here we are implementing Routed Event WPF concept outside of WPF.
Such event can Bubble and Tunnel and
also can propagate to Tree Node‘s descendants on any
Tree defined by its up and down propagation functions,
not only the Visual Tree. Such events can also be attached to any
objects, not only to FrameworkElements. The routing behavior of such an event is determined at the
time when it is raised, not at the time when it is defined. The event can have up to 4 arguments
specified by generic types.
Usage Example
We are going to show how the API is being used first, and only after that describe the implementation.
The test code is located within Program.cs file under AttachedRoutedEventTest project. We build the Tree in exactly the same fashion as it was done in Tree Structures and Navigation:
#region Start building tree out of TestTreeNodes objects
TestTreeNode topNode = new TestTreeNode { NodeInfo = "TopNode" };

TestTreeNode level2Node1 = topNode.AddChild("Level2Node_1");
TestTreeNode level2Node2 = topNode.AddChild("Level2Node_2");

TestTreeNode level3Node1 = level2Node1.AddChild("Level3Node_1");
TestTreeNode level3Node2 = level2Node1.AddChild("Level3Node_2");

TestTreeNode level3Node3 = level2Node2.AddChild("Level3Node_3");
TestTreeNode level3Node4 = level2Node2.AddChild("Level3Node_4");
#endregion End tree building
Here is how we define the toParentFunction and toChildrenFunction for the tree:
// to parent function
Func toParentFn =
    (treeNode) => treeNode.Parent;

// to children function
Func<TestTreeNode, IEnumerable> toChildrenFn =
    (treeNode) => treeNode.Children;
First we print all the nodes of the tree shifted to the right in proportion to their distance from the top node:
IEnumerable<TreeChildInfo<TestTreeNode>> allTreeNodes =
    topNode.SelfAndDescendantsWithLevelInfo(toChildrenTreeFunction);

// print all the tree nodes
Console.WriteLine("\nPrint all nodes");
foreach (TreeChildInfo<TestTreeNode> treeNode in allTreeNodes)
{
    string shiftToRight = new string('\t', treeNode.Level + 1);
    Console.WriteLine(shiftToRight + treeNode.TheNode.NodeInfo);
}
Here is the result of printing:
TopNode
    Level2Node_1
        Level3Node_1
        Level3Node_2
    Level2Node_2
        Level3Node_3
        Level3Node_4
Here is how we create REvent:
REvent<TestTreeNode, string> aTestEvent = new REvent();
By the type arguments we specify that this REvent will act on objects
of the type TestTreeNode and will be accepting objects of type
string as arguments – overall we can specify from 0 to 4 arguments
of different types for the REvent objects.
Now we can set our REvent‘s handlers for all the nodes of the tree:
// assign handlers for each of the
foreach (TreeChildInfo<TestTreeNode> treeNodeWithLevelInfo in allTreeNodes)
{
    TestTreeNode currentNode = treeNodeWithLevelInfo.TheNode;

    aTestEvent.AddHander
    (
        currentNode,
        (str) =>
        {
            Console.WriteLine("Target Node: " + currentNode.NodeInfo + "\t\t\tSource Node: " + str);
        }
    );
}
The handler would print the current node’s name and the string passed to the handler as
the source node’s name (it is assumed that the RaiseEvent function has the
name of the raising tree node passed as an argument).
Now we raise different events (bubbling, tunneling, direct and propagating to children) and observe the results
Bubbling Event
Console.WriteLine("\nTesting event bubbling:");
aTestEvent.RaiseBubbleEvent(level3Node3, toParentTreeFunction, level3Node3.NodeInfo);
Bubbling event raised from the bottom level node level3Node3 will print the node itself and
all its ancestors printing first those who are closer to the originating node level3Node3:
Testing event bubbling:
Target Node: Level3Node_3			Source Node: Level3Node_3
Target Node: Level2Node_2			Source Node: Level3Node_3
Target Node: TopNode			        Source Node: Level3Node_3
Tunneling Event
Console.WriteLine("\nTesting event tunneling:");
aTestEvent.RaiseTunnelEvent(level3Node3, toParentTreeFunction, level3Node3.NodeInfo);
Tunneling event will print the same nodes in the opposite order – starting from the top node and
ending with the originating node:
Testing event tunneling:
Target Node: TopNode			        Source Node: Level3Node_3
Target Node: Level2Node_2			Source Node: Level3Node_3
Target Node: Level3Node_3			Source Node: Level3Node_3
Direct Event
Console.WriteLine("\nTesting event Direct Event (without bubbling and tunneling):");
aTestEvent.RaiseEvent(level3Node3, level3Node3.NodeInfo);
Direct event will only print on the invoking node:
Testing event Direct Event (without bubbling and tunneling):
Target Node: Level3Node_3			Source Node: Level3Node_3
Event Propagating to Descendents
Console.WriteLine("\nTesting event propagation to descendents:");
aTestEvent.RaiseEventPropagateToDescendents(level2Node1, toChildrenTreeFunction, level2Node1.NodeInfo);
Event propagating to descendents fired from level2Node1 node located at the middle level,
will print the node itself and its two descendents:
Testing event propagation to descendents:
Target Node: Level2Node_1			Source Node: Level2Node_1
Target Node: Level3Node_1			Source Node: Level2Node_1
Target Node: Level3Node_2			Source Node: Level2Node_1
Terminating Event Propagation
One can pass a Func instead of na Action to become an event
handler for the REvent. In that case, returning false from that function
would terminate the REvent propagation – analogous to setting e.Cancel=true
for WPF’s routed event.
Below we clear the event handler at level2Node2 node and reset to to
a Func that always returns false:
// stopping propagation by returning false from a handler
aTestEvent.RemoveAllHandlers(level2Node2);

aTestEvent.AddHander
(
    level2Node2,
    () =>
    {
        Console.WriteLine("Terminating event propagation at node " + level2Node2.NodeInfo);
        return false;
    }); // terminate event propagation at this node
After this we re-run the bubbling, tunneling and propagating to children events:
Console.WriteLine("\nTesting event bubbling with event propagation termination:");
aTestEvent.RaiseBubbleEvent(level3Node3, toParentTreeFunction, level3Node3.NodeInfo);


Console.WriteLine("\nTesting event tunneling with event propagation termination:");
aTestEvent.RaiseTunnelEvent(level3Node3, toParentTreeFunction, level3Node3.NodeInfo);


Console.WriteLine("\nTesting event propagation to descendents with event propagation termination:");
aTestEvent.RaiseEventPropagateToDescendents(topNode, toChildrenTreeFunction, topNode.NodeInfo);
The results of these are shown below:
Testing event bubbling with event propagation termination:
Target Node: Level3Node_3			Source Node: Level3Node_3
Terminating event propagation at node Level2Node_2

Testing event tunneling with event propagation termination:
Target Node: TopNode			Source Node: Level3Node_3
Terminating event propagation at node Level2Node_2

Testing event propagation from the TopNode to its descendents with event propagation termination:
Target Node: TopNode			    Source Node: TopNode
Target Node: Level2Node_1			Source Node: TopNode
Target Node: Level3Node_1			Source Node: TopNode
Target Node: Level3Node_2			Source Node: TopNode
Terminating event propagation at node Level2Node_2
You can see that the event propagation stops indeed at level2Node2 node.
Notes on Implementation
NP.Paradigms.REvent implementation code is located within REvent.cs file
under NP.Paradigms project.
REvent class defines AProperty _aProperty. Its purpose is to provide
a mapping between the objects on which some REvent handlers were set and objects of type
REventWrapper that actually saves the REvent handlers.
REventWrapper has _event member of List<Func<T1,T2,T3,T4,bool>>
type. It accumulates all of the event handlers associated with its object. It also has a bunch of functions
that help to convert Actions and Funcs with smaller amount of generic
type arguments into Func<T1,T2,T3,T4, bool>. There is also a map:
Dictionary<object, Func> _delegateToFuncMap that stores the mapping between
the original Action or Func with smaller number of generic type arguments and
the final Func<T1,T2,T3,T4>. This is needed if we want to remove a handler – we’ll need to find
the correct Func<T1,T2,T3,T4> and remove if from the _event list.
REvent class has various functions for adding the event handlers to an object. It also has functions
for raising event on an object so that it would propagate in a required fashion: bubbling, tunneling, direct or
propagation to children – as they were presented in the usage example section.
Tree Structures and Navigation
November 29, 2013Code Location
The code for this blog post can be downloaded from
TreeTestsCode.zip.
Introduction
I continue a series of blog posts about implementing WPF
concepts outside of WPF.
This post talks about generic Tree structures in C#. The relationship with WPF will become
clearer once we start talking about Routed Events outside of WPF (hopefully in the next post).
In his great LINQ TO VISUAL TREE
and LINQ to Tree – A Generic Technique for Querying Tree-like Structures articles, Colin Eberhardt talks about queries various
Tree
structures using LINQ. In order to fit the Tree structure into his framework the user of the code should either build an
adaptor satisfying ILinqToTree interface for the tree nodes, or generate such adaptor and the corresponding
LINQ functions using VisualStudion T4 templates.
Here I am defining a Tree structure without resorting to adapter interface
and using delegates instead. This
makes it more generic and makes it possible to apply the concept to a very wide class of objects without T4 template
generation.
What is a Tree?
A Tree is a set of objects called the Tree Nodes.
From any Tree Node one should be able to find its unique parent
Tree Node
(if it exists) or its collection of child Tree Nodes (if they exist). The above
Tree definition allows to find all the Tree Nodes
of a Tree recursively, the following information is given:
- A Tree Node to start navigation.
- A function that for any Tree Node
returns its parent Tree Node ornull
(if it has no parent). - A function that for any Tree Node returns a collection of its children
(it might benullor empty collection if no such children exist).
Translating the above into C# (or any other object oriented language that allows delegates or lambdas) we can write that
the Tree can be defined by one Tree Node
object or a generic type TreeNode and two delegates:
Func<TreeNode, TreeNode> ToParentFunction
and
Func<TreeNode, IEnumerable<TreeNode>> ToChildrenFunction
Note, also, that for navigating up the Tree only ToParentFunction is
required while for navigating down the Tree – only ToChildrenFuncion.
The Tree API
Based on the discussion above I created a generic API for navigating up and down the Tree
using C# extension functions.
The API is located within NP.Paradigms.TreeUtils static class under NP.Paradigms project.
The available functions are very similar to those from Colin Eberhardt’s articles, the difference is that one extra
argument is required – the function for navigation up or down a Tree:
/// Returns a collection of all ancestors of a node.
public static IEnumerable<NodeType> Ancestors<NodeType>
(
this NodeType node,
Func<NodeType, NodeType> toParentFunction
)

/// Returns the node itself and all its ancestors a part of a collection.
public static IEnumerable<NodeType> Ancestors<NodeType>
(
this NodeType node,
Func<NodeType, NodeType> toParentFunction
)

/// returns itself and all its descendants as part of a collection
/// of TreeChildInfo object that contain the node itself and the
/// distance from to original node (called Level).
/// Original node passed as an agument to this function
/// has its level specified by the level argument (the default is 0)
/// its children will have Level property set to 1, grandchildren - to 2 etc.
public static IEnumerable<TreeChildInfo<NodeType>> SelfAndDescendantsWithLevelInfo<NodeType>
(
this NodeType node,
Func<NodeType, IEnumerable<NodeType>> toChildrenFunction,
int level = 0
)

/// Returns the descendants nodes with level info (just like SelfAndDescendantsWithLevelInfo)
/// only within the original node itself.
public static IEnumerable<TreeChildInfo<NodeType>> DescendantsWithLevelInfo<NodeType>
(
this NodeType node,
Func<NodeType, IEnumerable<NodeType>> toChildrenFunction
)

/// Returns the original node and its descendants as part of a collection
public static IEnumerable<NodeType> SelfAndDescendants<NodeType>
(
this NodeType node,
Func<NodeType, IEnumerable<NodeType>> toChildrenFunction
)

/// Returns the descendants of an original node as a collection
public static IEnumerable<NodeType> Descendants<NodeType>
(
this NodeType node,
Func<NodeType, IEnumerable<NodeType>> toChildrenFunction
)
{
return node.DescendantsWithLevelInfo(toChildrenFunction).Select((treeChildInfo) => treeChildInfo.TheNode);
}

/// Returns the anscestors of the current node (starting from the Root node)
/// and the current node's descendants. Level specifies the
/// distance from the Root Node (top node)
public static IEnumerable<TreeChildInfo<NodeType>> AncestorsAndDescendants<NodeType>
(
this NodeType node,
Func<NodeType, NodeType> toParentFunction,
Func<NodeType, IEnumerable<NodeType>> toChildrenFunction
)

/// returns all the nodes of the tree except for the
/// original node itself, its descendents and ancestors (the top node is still returned
/// even thought it is an ascestor).
public static IEnumerable<TreeChildInfo<NodeType>> AllButAncestorsAndDescendants<NodeType>
(
this NodeType node,
Func<NodeType, NodeType> toParentFunction,
Func<NodeType, IEnumerable<NodeType>> toChildrenFunction
)
The last two functions AncestorsAndDescendants and AllButDescendantsAndAncestors
do not have analogues in Colin Eberhardt’s articles but are still pretty useful sometimes.
Non-Visual Tree Usage Example
The usage example can be found under project TreeTests (do not forget to make this project
a start up project within the solution).
In the Main function of this project (located within Program.cs file,
we build a tree out of TestTreeNode objects. Each TestTreeNode object
contains a Parent property specifying the parent of the node, Children
collection specifying the children of the node and NodeInfo property – which is
simply a string that should uniquely identify the node. Function AddChild(string childNodeInfo)
fascilitates building the tree. It adds a child node setting its NodeInfo property to the
passed string parameter and setting its Parent property to the current node.
Here is how we build the tree:
#region Start building tree out of TestTreeNodes objects
TestTreeNode topNode = new TestTreeNode { NodeInfo = "TopNode" };

TestTreeNode level2Node1 = topNode.AddChild("Level2Node_1");
TestTreeNode level2Node2 = topNode.AddChild("Level2Node_2");

TestTreeNode level3Node1 = level2Node1.AddChild("Level3Node_1");
TestTreeNode level3Node2 = level2Node1.AddChild("Level3Node_2");

TestTreeNode level3Node3 = level2Node2.AddChild("Level3Node_3");
TestTreeNode level3Node4 = level2Node2.AddChild("Level3Node_4");
#endregion End tree building
The functions to go up and down the tree are specified in the following way:
// to parent function
Func<TestTreeNode, TestTreeNode> toParentFn =
(treeNode) => treeNode.Parent;

// to children function
Func<TestTreeNode, IEnumerable<TestTreeNode>> toChildrenFn =
(treeNode) => treeNode.Children;
Finally we print anscestors and descendents of the nodes:
Console.WriteLine("Print ancestors of node level3Node3");

foreach (var treeNode in level3Node3.Ancestors(toParentFn))
Console.WriteLine("\t" + treeNode.NodeInfo);

Console.WriteLine("\n");

Console.WriteLine("Print self and ancestors of node level3Node3");
foreach (var treeNode in level3Node3.SelfAndAncestors(toParentFn))
Console.WriteLine("\t" + treeNode.NodeInfo);

Console.WriteLine("\nPrint whole tree");

foreach (var treeNodeInfo in topNode.SelfAndDescendantsWithLevelInfo(toChildrenFn))
{
// shift the string by the level number plus 1 tabs
string tabs = new string('\t', treeNodeInfo.Level + 1);

Console.WriteLine(tabs + treeNodeInfo.TheNode.NodeInfo);
}
Here are the printed results:
Print ancestors of node level3Node3
Level2Node_2
TopNode

Print self and ancestors of node level3Node3
Level3Node_3
Level2Node_2
TopNode

Print whole tree
TopNode
Level2Node_1
Level3Node_1
Level3Node_2
Level2Node_2
Level3Node_3
Level3Node_4
Note, that when we print the top node of the tree and its descendents (the last print out)
we shift the descendents to the right by placing Tab characters in front of the strings.
The number of those tab characters equals to the Level property of the
corresponding TreeNodeInfo object so that the farther the nodes are
from the top node, the farther to the right they will appear.
WPF Visual and Logical Trees Usage Examples
WPF VisualTreeHelper and LogicalTreeHelper classes can furnish us
with delegates to go up and down visual and logical trees correspondingly. Project
NP.Paradigms.Windows contains VisualTreeUtils and LogicalTreeUtils
static classes providing LINQ functions for Visual an Logical trees correspondingly. They are
simply wrappers around NP.Paradigms.TreeUtils class described above.
VisualTreeHelper operates on objects of FrameworkElement class. Because of this,
all the VisualTreeUtils functions operate on FrameworkElement objects.
Here is how we define the ToParentFunction and ToChildFunction for the
VisualTreeUtils class:
static Func<FrameworkElement, FrameworkElement> toParentFunction =
(obj) => VisualTreeHelper.GetParent(obj) as FrameworkElement;

static Func<FrameworkElement, IEnumerable<FrameworkElement>> toChildrenFunction =
(parentObj) =>
{
int childCount = VisualTreeHelper.GetChildrenCount(parentObj);

List<FrameworkElement> result = new List<FrameworkElement>();
for (int i = 0; i < childCount; i++)
{
result.Add(VisualTreeHelper.GetChild(parentObj, i) as FrameworkElement);
}

return result;
};
The extension method of VisualTreeUtility class are self explanotary and
correspond to the TreeUtils class methods one to one except that they start
with prefix Visual to avoid the name clashes.
When it come to LogicalTreeHelper, some of the children, that it returns
might not be of FrameworkElement type. If fact contents of the Buttons or
of TextBlock or other objects can be simply strings. Because of that we define all of our
extension methods on plain objects. Here is how the ToParentFunction and ToChildFunction
are defined for the logical tree:
static Func<object, object> toParentFunction =
(obj) =>
{
if ( !(obj is DependencyObject) )
{
return null;
}

return LogicalTreeHelper.GetParent(obj as DependencyObject);
};

static Func<object, IEnumerable<object>> toChildrenFunction =
(parentObj) =>
{
if (!(parentObj is DependencyObject))
{
return null;
}

return LogicalTreeHelper.GetChildren(parentObj as DependencyObject).Cast<object>();
};
The extension methods of the LogicalTreeUtils class are also self explanotary and have
preffix Logical to avoid the name clashes.
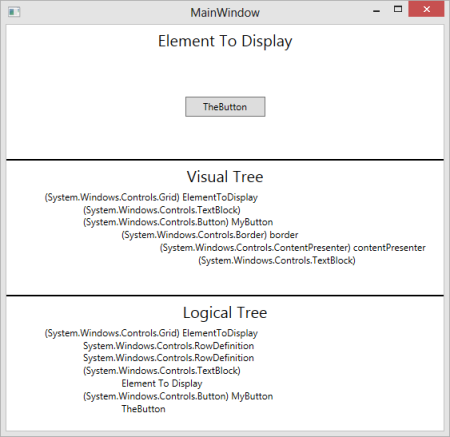
The usage example for VisualTreeHelper and LogicalTreeHelper methods
is located under VisualTreeTests project. The function MainWindow_Loaded
gets the tree nodes for the visual and logical trees of ElementToDisplay grid that
contains a TextBlock and a Button. The collections of tree nodes
are converted into collections of TreeNodeDisplayer objects that transform the
tree nodes into indented strings: FrameworkElements are displayed by their type name
in parentheses followed by name and other objects are simply converted to strings using
ToString() method. The indentation is related to their level within the tree
(how far they are from the root node of the tree). The visual and logical trees are displayed
under the ElementToDisplay:
Bind Markup Extension
November 25, 2013
I continue a series of blog posts about implementing WPF
concepts outside of WPF.
Even though, the purpose of these articles is to show how to implement
and use WPF concepts outside of WPF, WPF and XAML application are still the major beneficiaries of
this new approach which will allow to e.g. create bindings between properties on the non-visual View Models
or extend the non-visual View Models (by using AProperties) without modifying the View Model code.
Because of this, it makes sense to create a XAML markup extension for the non-WFP binding
described in Composite Path Bindings outside of WPF. This article talks about creating and using such markup extension.
The source code for this blog post is located under
BindMarkupExtensionCode.zip link.
Bind Extension
To distinguish the new markup extension from WPF’s Binding markup extension, we’ll call it Bind
or BindExtension.
BindExtension class is located under NP.Paradigms.Windows project. It extends
System.Windows.Markup.MarkupExtension class. It has the following public properties that can be
set in XAML:
Source– allows to specify the binding source object. IfSourceproperty is not
specified, we are trying to figure out the source object from other properties e.g.
SourceElementNamedescribed below. If nothing helps, the source object is assumed to be the same
as the target object (we still have no notion similar to theDataContextin WPF bindings).SourceElementName– is similar toElementNameof WPF binding. It allows to specify a
named XAML element to serve as theBinding‘s source.SourcePath– a string that specifies the path of the binding relative to the binding’s
Sourceobject.
The path links are separated by periods (‘.’). The plain properties are specified as strings. The WPF attached
or dependency properties are placed within parentheses. TheAPropertiesare placed within two
asterisks. Here is a composite path sample:MyPlainProp.(this:MyAttachedProps.MyTestAttachedProp).*this:MyTestAProps.MyTestAProp*. This path is looks forAPropertyMyTestAProps.MyTestAPropwithin
an object defined by an attached propertyMyAttachedProps.MyTestAttachedPropwithin an object
define by a plain propertyMyPlainPropof the source object of the binding. Both attached property
andAPropertyare defined within the current project specified by XAML prefix “this:”.TargetPath– a string that specifies the path to the target of the binding
with respect to the target binding object and the target property. Unlike the WPF binding
our composite path binding allows to specify a composite target path (see Composite Path Bindings outside of WPF). The first link or the
target path will always be the target property defined within XAML. The subsequent links can be
defined byTargetPathstring. Here is a XAML example
<Grid DataContext={Bind TargetPath="MyProp"...}. This example will not set the
DataContextproperty on the grid. Instead it will useDataContextproperty as the first link
in the target binding and will modifyDataContext.MyPropproperty instead (if it exists, of course).
IfTargetPathis not specified, the XAML target property will be modified.TheBindType– similar to WPF binding’sMode. Here are the possible valuesOneWay– binding from source to target propertyOneWayReverse– binding from target to source property (similar to WPF’sOneWayToSource)TwoWay– binds source and target properties together so that when one of them changes, the other changes also. The initial value is set from source to target.TwoWayReverseInit– binds source and target properties together so that when one of them changes, the other changes also. The initial value is set from target to source.
Usage Samples
Project XamlBindingTests shows how to use the BindExtension in XAML. The relevant XAML code is located within
MainWindow.xaml file. Here is how the test application looks:
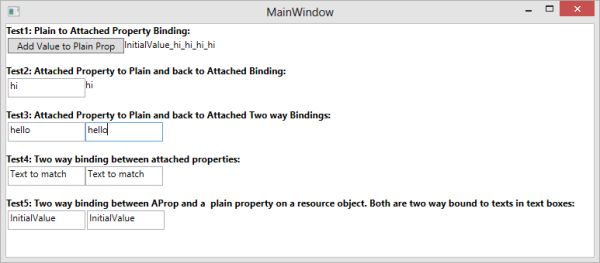
Test1 demonstrates attaching plain property to dependency property using Bind extension.
Text property of a TextBlock is bound to MyTestProp property
of a resource object MyTestDataObj_Test1:
<TextBlock Text="{winparadigms:Bind Source={StaticResource MyTestDataObj_Test1},
                                    SourcePath=MyTestProp}"
           Grid.Column="1"/>
When a button “Add Value to Plain Prop” is clicked the property of the resource object is added “_hi” at the end and the binding
transfers the corresponding change to the Text property of the TextBlock object.
Test2 shows how to set the binding in both directions – from a Text property on
TextBox to a resource object and
from the resource object to the Text property on a TextBlock:
<TextBox Width="100"
          Height="25"
          Text="{winparadigms:Bind Source={StaticResource MyTestDataObj_Test2},
                                 SourcePath=MyTestProp,
                                 TheBindType=OneWayReverse}"/>

<TextBlock Text="{winparadigms:Bind Source={StaticResource MyTestDataObj_Test2},
                                    SourcePath=MyTestProp}"
           Grid.Column="1" />
When you start typing
in the TextBox the TextBlock text shows next to it.
Test3 demos a two TwoWay bindings – one from a TextBox to a resource object and
the other from the same resource object back to a different text box.
The two text boxes are thus bound in both directions via a resource object:
<TextBox Width="100"
            Height="25"
            Text="{winparadigms:Bind Source={StaticResource MyTestDataObj_Test3},
                                    SourcePath=MyTestProp,
                                    TheBindType=TwoWayReverseInit}" />

<TextBox Width="100"
          Height="25"
          Text="{winparadigms:Bind Source={StaticResource MyTestDataObj_Test3},
                                 SourcePath=MyTestProp,
                                 TheBindType=TwoWay}"
          Grid.Column="1" />
Test4 shows how to use SourceElementName to bind Text properties in
two TextBox objects:
<TextBox Width="100"
            Height="25"
            Text="{winparadigms:Bind SourceElementName=TextBoxToMatch,
                                    SourcePath=(TextBox.Text),
                                    TheBindType=TwoWay}" />
<TextBox Width="100"
          Height="25"
          x:Name="TextBoxToMatch"
          Text="Text to match"
          Grid.Column="1" />
Finally Test5 shows how to bind an AProperty. The AProperty
this:MyAProps.MyTestAProp is defined on the
resource object MyTestDataObj_Test5. It is bound to its own plain property MyTestProp:
<this:MyTestData x:Key="MyTestDataObj_Test5"
                  this:MyAProps.MyTestAProp="{winparadigms:Bind SourcePath=MyTestProp, TheBindType=TwoWay}"
                  MyTestProp="InitialValue" />
Also one TextBox of Test5 binds its Text to the plain MyTestProp
of the resource object MyTestDataObj_Test5, while the other TextBox of the test
binds to the AProperty:
<TextBox Width="100"
         Height="25"
         Text="{winparadigms:Bind Source={StaticResource MyTestDataObj_Test5},
                                  SourcePath=MyTestProp,
                                  TheBindType=TwoWay}" />
<TextBox Width="100"
         Height="25"
         Text="{winparadigms:Bind Source={StaticResource MyTestDataObj_Test5},
                                  SourcePath=*this:MyAProps.MyTestAProp*,
                                  TheBindType=TwoWay}"
         Grid.Column="2" />
Thus the two TextBoxes are bound together via a plain property and an AProperty on a resource object.
Composite Path Bindings outside of WPF
June 27, 2013Composite Path Bindings outside of WPF
Introduction
In AProperties and Bindings outside of WPF Revisited I presented implementation of binding concepts using IPropGetter and IPropSetter interfaces. This implementation allowed binding a source property on a source object to a target property on a target object. Both plain properties and AProperties could be used as source and target.
The binding dicussed at the link above, has a limitation, though, in that it only deals with immediate properties of the source or the target. You cannot bind to a property with a complex path to it. This blog entry aims to resolve this problem. Not only it will provide the functionality for binding using a complex path to the source property (something the WPF binding functionality also allows), but it will show how to use a complex path at the target side as well (something that WPF does not permit).
When dealing with complex path to the source property, there is always a posibility that the such path simply does not exist. In that case the binding can provide a default value to the target property. This default value is similar to WPF binding’s FallbackValue property.
The source code for the article is located under CompositePathTests.zip file.
Sample that Uses Composite Path Bindings
The main project is CompositePathToTargetTest. Most of the sample code is located within Program.cs file.
Both source and target object of this sample are of ParentDataClass type. ParentDataClass has a property TheData of type DataClass. DataClass in turn has a property MyStringProp of type string. The sample shows how to bind MyStringProp property of the TheData property of the source object to the same path within the target object.
The class that was called BindingPath in the previous articles is renamed to BindingPathLink. This class chooses correct property “getter” and “setter” for the binding. The composite paths consist of a collection of the BindingPathLink objects. Here is how such collection is created for the source object:
CompositePathGetter sourcePathGetter =
    new CompositePathGetter
    (
        new BindingPathLink<object>[]
        {
            new BindingPathLink<object>("TheData"),
            new BindingPathLink<object>("MyStringProp"),
        },
        "A Default String"
    );
CompositePathGetter requires a collection of path links and a default value that will be sent to the target if the path to the source does not exist (remember it is similar to the FallbackValue of the WPF binding).
The setter for the binding’s target is created in a similar way:
CompositePathSetter targetPathSetter = new CompositePathSetter
    (
        new BindingPathLink<object>[]
        {
            new BindingPathLink<object>("TheData"),
            new BindingPathLink<object>("MyStringProp")
        }
    );
only here we do not need to pass the default value parameter.
Then we set the source and target objects of the source getter and target setter:
 sourcePathGetter.TheObj = sourceDataObj;
 targetPathSetter.TheObj = targetDataObject;
We set the corresponding getter and setter properties of the binding:
binding.SourcePropertyGetter = sourcePathGetter;
binding.TargetPropertySetter = targetPathSetter;
Then after we call function Bind() on the binding object, the binding becomes operational and the source value is set on the target: calling Console.WriteLine(targetDataObject.TheData.MyStringProp); will print “Hello World”.
Then if we change the source property: sourceDataObj.TheData.MyStringProp = "Hi World"; the target property will also change to “Hi World”. If we change the TheData property of the source object, the target will also reflect the change:
sourceDataObj.TheData = new DataClass { MyStringProp = "bye bye" };
will set the target property to “bye bye”.
If TheData property of sourceDataObj is set to null, the default binding value “A Default String” will be set to the target property.
If TheData property of the targetDataObj is set to null, the old binding value is retained and will be set to the MyStringProp property of the new TheData object, if at some point it becomes non-null.
Notes on Implementation
Instead of IPropGetter<PropertyType> and IPropSetter<PropertyType> interfaces, used in the previous articles for implmenting the binding’s getter and setter, we use IObjWithPropGetter<PropertyType> and IObjWithPropSetter<PropertyType> interfaces that also allow setting the object for which the properties are read or set. This is done in order not to recreate the getter and setters every time the path’s objects are created or destroyed.
CompositeClassGetter represents a chain of IObjWithPropGetter<PropertyType> objects built from a list of BindingPathLink objects that represent the path to the source property from the source object. The PropertyChangedEvent of each IObjWithPropGetter is handled by setting the corresponding object for the next property getter. The handler for the last object is set to call the PropertyChangeEvent on the CompositeClassGetter object:
IObjWithPropGetter<object> previousPropGetter = null;
foreach (var pathLink in _pathLinks)
{
    IObjWithPropGetter<object> propGetter = pathLink.GetPropertyGetter();

    _propGetters.Add(propGetter);

    if (previousPropGetter != null)
    {
        previousPropGetter.PropertyChangedEvent += (obj) =>
            {
                propGetter.TheObj = obj;
            };
    }

    previousPropGetter = propGetter;
}

previousPropGetter.PropertyChangedEvent += (obj) =>
    {
        if (this.PropertyChangedEvent == null)
            return;

        if (!LastPropGetter.HasObj)
        {
            PropertyChangedEvent(_defaultValue);
        }
        else
        {
            PropertyChangedEvent(obj);
        }
    };
CompositePathSetter consists of IObjWithPropSetter object corresponding to the last link of the target property path and a chain of IObjWithPropertyGetter objects corresponding to the rest of the links. The PropertyChangedEvent of each of the property getters sets the object on the next property getter (or setter):
IObjWithPropGetter<object> previousPropGetter = null;
foreach (var propGetter in _propGetters)
{
    if (previousPropGetter != null)
    {
        previousPropGetter.PropertyChangedEvent += (obj) =>
        {
            propGetter.TheObj = obj;
        };
    }

    previousPropGetter = propGetter;
}

// set the last property getter to the set the setter
previousPropGetter.PropertyChangedEvent += (obj) =>
{
    _theSetter.TheObj = obj;
};
AProperties and Bindings outside of WPF Revisited
May 21, 2013AProperties and Bindings outside of WPF Revisited
In the past I had a series of blog posts about re-implementing WPF concepts outside of WPF (see Codeproject: Binding without WPF, Codeproject: Attached Properties outside of WPF and Codeproject: Expression based Property Getters and Setters).
This post continues talking about non-WPF Attached Properties (AProperties) and Bindings (as well as the LINQ Expression property getters and setters) fixing problems left from the previous posts and preparing the readers for other interesting concepts that will to be expained the future articles.
Rearranging the Code
The new source code is located under BindingParadigmsCode.zip file. I rearranged the all the code related to the 3 blog posts mentioned above under the same project (namespace) NP.Paradigms. Some utility code I placed under NP.Paradigms.Extensions sub-namespace (sub-folder). Directory BindingParadigmsCode\TESTS contains the usage samples for
the functionality.
AProperties without Memory Leaks
AProperties (attached properties implemented outside of WPF)
were introduced in Codeproject: Attached Properties outside of WPF.
In fact as described at the link above, the AProperties are, in many respects, more powerful than the regular WPF Attached Properties.
As a brief refresher, AProperties maps an object to some value by the object’s reference, so that the value can be retrieved given the object reference. Unlike the usual C# properties (and like the WPF’s Attached Properties), the AProperties do not need
to be defined on the object itself, instead, they are kind of externally attached to the object. Each AProperty has an internal map _objectToPropValueMap that maps the object’s reference to the corresponding AProperty value.
As one reader noticed, the AProperties might introduce a memory leak, in a sense that
when all the outside references to the object that has some non-default AProperty value are removed, the _objectToPropValueMap dictionary within the corresponding AProperty might still hold a reference to the original object, so that the object is not garbage collected and the corresponding cell also stays within the _objectToPropValueMap dictionary. In fact the key of the map is the object itself, while the value (of type APropertyValueWrapper) has a reference Obj to the object.
In order to fix the memory leak, I replaced the value’s reference to the object by a WeakReference and replaced the Dictionary with ConditionalWeakTable class located within System.Runtime.CompilerServices namespace. ConditionalWeakTable class provides an implementation of Dictionary or Map with weak key references, allowing the garbage collector to collect the object and once the object is collected, it automatically removes it from the Map.
I tested performance of ConditionalWeakTable vs. usual C# Dictionary performance and found that the search and the insertion is approximately 1.4-1.6 times slower (which I deemed acceptable).
The code containing the AProperty garbage collection tests is located under CollectableAPropsTest project. Here is the body of the Main function with detailed comments:
 // create an object of MyClass class
MyClass myObj = new MyClass();

// create AProperty that assigns string to MyClass objects
AProperty<MyClass, string> myAProp = new AProperty<MyClass, string>(null);

myAProp.SetProperty(myObj, "Hello World");

// try to do garbage collection,
// the myObj should not be collected at this point
// since the main program has a strong reference to it.
GC.Collect();

// the property should not be collected at this point
// since the reference to the object still exists in the
// Main program.
string thePropValue = myAProp.GetProperty(myObj);

Console.WriteLine("The AProp Value is " + thePropValue);

// set the only 'strong' reference to myObj to null
myObj = null;

// after the only 'strong' reference to myObj
// was set to null, the call to 'GC.Collect()' should
// collect the object not-withstanding the fact
// that it is still weakly refenced from within myAProp object.
GC.Collect();
// destructor should be called before sleep or in the beginning of sleep;
Console.WriteLine("before sleep");
Thread.Sleep(3000);

GC.Collect();

// if you put a break point at the next line,
// and expand the internals of myAProp object,
// you'll see that it has no objects within it
// (the weak reference key has been removed)
Console.WriteLine("After sleep");
If you put a breakpoint at the last line and expand myAProp
object, you will see that its _objectToPropValueMap
does not contain any entries (its key and value counts are zero),
meaning as the object had been collected, the corresponding map entry was
removed also:

New Expression Based Property Getters and Setters
A blog post Codeproject: Expression based Property Getters and Setters talked about creating precompiled LINQ Expression based property getters and setters. They required the a-priory knowledge of the object and property types since they were returning Func<ObjectType, PropertyType> – for a getter and Action<ObjectType, PropertyType> – for a setter, with the requirement that the ObjectType and PropertyType should match the types of the object and property to which they are applied. Here I provided some extra methods where this requirement is relaxed – Func<object, object> is returned for a getter and Action<object, object> is returned for setter. This incurs an extra cast operation for a getter and two extra cast operations for a setter (the one for the object and for the property), but the expressions are still precompiled and the performance of the untyped lambdas is still very close to that of their strongly typed counterparts and greatly exceeds that of the reflection based functionality. The actual types of the untyped getters and setters can be inferred from the object and the property itself.
I placed this functionality under NP.Paradigms.Extensions namespace so that its extension methods will not pollute the main namespace.
To underscore that this functionality deals only with plain C# properties, I inserted CS within the function names.
The testing project for the functionality is called ExpressionCSPropertyGettersAndSettersTests and is located under TESTS folder. Here is the body of its Main method with the comments:
MyClass myTestObj = new MyClass();

// strongly typed property getter
Func<MyClass, string> stronglyTypedPropertyGetter =
    CompiledExpressionUtils.GetCSPropertyGetter<MyClass, string>("MyProperty");

// test strongly typed property getter (should return "Hello World")
Console.WriteLine("\nTesting strongly typed property getter");
Console.WriteLine(stronglyTypedPropertyGetter(myTestObj));

// get the untyped but compiled property getter (should be a little slower
// due to an extra cast operation, but still pretty close in perfromance
Func<object, object> untypedPropertyGetter = myTestObj.GetUntypedCSPropertyGetter("MyProperty");

// test the untyped property getter ( should return "Hello World")\\
Console.WriteLine("\nTesting untyped property getter");
Console.WriteLine(untypedPropertyGetter(myTestObj));

// strongly typed property setter
Action<MyClass, string> stronglyTypedPropertySetter =
    CompiledExpressionUtils.GetCSPropertySetter("MyProperty");

// set the property using strongly typed property setter
stronglyTypedPropertySetter(myTestObj, "Hi World");
Console.WriteLine("\nTesting strongly typed property setter");
Console.WriteLine(myTestObj.MyProperty);

// get the untyped by compiled property setter
Action<object, object> untypedPropertySetter = myTestObj.GetUntypedCSPropertySetter("MyProperty");

// use the untyped property setter to changed the property back to "Hello World"
untypedPropertySetter(myTestObj, "Hello World");
Console.WriteLine("\nTesting untyped property setter");
Console.WriteLine(myTestObj.MyProperty);
and here is the code for MyClass class:
public class MyClass
{
    public string MyProperty { get; set; }

    public MyClass()
    {
        MyProperty = "Hello World";
    }
}
New Property Binding Functionality
Non-WPF property and collection bindings is described at
Codeproject: Binding without WPF blog post. The only properties we dealt with there, were plain C# properties that fire INotifyPropertyChanged.PropertyChanged event when modified. Now we also have AProperty concept and we want to bind them too. Moreover, sometimes we might want to bind a plain C# source property to an AProperty target and vice versa. Eventually we might also want to bind in a similar ways to WPF Attached Properties. Because of this new complexity, we have to take a different look at the property bindings.
As was shown at the previous binding blog post, the binding should implement IBinding interface:
public interface IBinding
{
    void InitialSync();
    void Bind(bool doInitialSync = true);
    void UnBind();
}
Let us take a look at the property binding from a different angle. A binding should be able to detect when the bound source property changes on the source object, get its value, possibly convert it to the type appropriate for the target property and set it on the target property of the target object. On top of this, when the binding is set, it would be logical to propagate the source property to the target property even though the source property did not change. It is logical to assume that the binding consists of 3 parts – property getter, property setter and property value converter. Property getter is an object of IPropGetter<PropertyType> interface that fires an event when the property changes that has the new property value as an argument. Also to cover the case of setting the target property value at the time when the binding is set (without the source property change) it has to have a method that would trigger the property propagation whenever the binding implementation needs it:
public interface IPropGetter<PropertyType>
{
    // fires when the property changes
    // its argument is new property value
    event Action PropertyChangedEvent;

    // forces PropertyChangedEvent to fire
    // (it is needed e.g. when when two properties
    // are bound - the source property should
    // trigger the target property change even
    // if the source property does not change)
    void TriggerPropertyChanged();
}
The target property setter can be represented by an even simpler interface that has only one method Set:
public interface IPropSetter<PropertyType>
{
    // sets the target property
    void Set(PropertyType property);
}
The converter is represented by IValConverter interface unchanged from the previous article:
public interface IValConverter<InputType, OutputType>
{
    OutputType Convert(InputType sourceObj);
}
OneWayProperytBindingBase class combines the property getter, setter and converter. Its Bind function binds the source property getter and target property setter. Note, that the property getter and setter within OneWayPropertyBindingBase class do not specify any particular implementation – they are interfaces that can be implemented for plain C# properties or AProperties.
The property getter and setter for plain C# properties are located under PlainPropGetterAndSetter.cs file and they are expression based, while AProperty getters and setters are defined under APropsGetterAndSetter.cs file. By combining the correct getter and setter types, one can bind plain C# property to another plain C# property or to an AProperty or vice versa – an AProperty to another AProperty or to a plain C# property. There is a utility class BindingPath (named like that after WPF’s PropertyPath) that facilitates resolving the getter and setter types.
OneWayPropertyBinding class extends OneWayPropertyBindingBase class and utilizes the BindingPath objects to figure out its
property getter and setter.
BindingTests project illustrates using the binding functionality connecting any combinations of plain C# properties and AProperties. The source and target objects are both of class MyTestDataClass that implements INotifyPropertyChanged interface and contains MyStringProp string property that fires the PropertyChanged event when it changes. The Main function’s code shows how to bind plain to plain, plain to AProperty, AProperty to plain and AProperty to AProperty. In each of these 4 cases, the binding sets the target property to be the same as the source property (“Hello World”) and then when the source property changes to “Hi World” the target property changes too. Here is the console output of the test run:
Testing binding from plain property to another plain property

Testing target property change after binding operation: Hello World
Testing target property change after the source property change: Hi World

Testing binding from plain property to another plain property

Testing target property change after binding operation: Hello World
Testing target property change after the source property change: Hi World

Testing binding from plain property to AProp

Testing target property change after binding operation: Hello World
Testing target property change after the source property change: Hi World

Testing binding from AProp to plain property

Testing target property change after binding operation: Hello World
Testing target property change after the source property change: Hi World
Press any key to continue . . .
Here is the Main method code:
#region Plain C# to Plain C# property binding
Console.WriteLine("\n\nTesting binding from plain property to another plain property\n");

// initialize test objects
MyTestDataClass sourceObj = new MyTestDataClass
{
    MyStringProp = "Hello World"
};

MyTestDataClass targetObj = new MyTestDataClass();

OneWayPropertyBinding<string, string> plainToPlainPropBinding =
    new OneWayPropertyBinding<string, string>();

plainToPlainPropBinding.SourceObj = sourceObj;
plainToPlainPropBinding.SourcePPath = new BindingPath<string>("MyStringProp");
plainToPlainPropBinding.TargetObj = targetObj;
plainToPlainPropBinding.TargetPPath = new BindingPath<string>("MyStringProp");

// bind the two properties.
plainToPlainPropBinding.Bind();

// verify that the binding changed the target property
// to be the same as the source property
Console.Write("Testing target property change after binding operation: ");
Console.WriteLine(targetObj.MyStringProp); // should print Hello World;

// let us change the source property and verify that target property also changes
sourceObj.MyStringProp = "Hi World";
Console.Write("Testing target property change after the source property change: ");
Console.WriteLine(targetObj.MyStringProp); // should print Hi World;

#endregion Plain C# to Plain C# property binding

#region AProperty to AProperty binding
Console.WriteLine("\n\nTesting binding from plain property to another plain property\n");

AProperty<object, string> myAProperty = new AProperty<object, string>();

// reinitialize test objects
sourceObj = new MyTestDataClass();
targetObj = new MyTestDataClass();

// set AProperty on the source object before the binding
myAProperty.SetProperty(sourceObj, "Hello World");

OneWayPropertyBinding<string, string> aPropToAPropBinding = new OneWayPropertyBinding<string, string>();

aPropToAPropBinding.SourceObj = sourceObj;
aPropToAPropBinding.SourcePPath = new BindingPath<string>(myAProperty);
aPropToAPropBinding.TargetObj = targetObj;
aPropToAPropBinding.TargetPPath = new BindingPath<string>(myAProperty);

aPropToAPropBinding.Bind();

Console.Write("Testing target property change after binding operation: ");
Console.WriteLine(myAProperty.GetProperty(targetObj));

// change the source property
myAProperty.SetProperty(sourceObj, "Hi World");

Console.Write("Testing target property change after the source property change: ");
Console.WriteLine(myAProperty.GetProperty(targetObj));

#endregion AProperty to AProperty binding

#region plain property to AProperty binding

Console.WriteLine("\n\nTesting binding from plain property to AProp\n");

// reinitialize test objects
sourceObj = new MyTestDataClass
{
    MyStringProp = "Hello World"
};

targetObj = new MyTestDataClass();

OneWayPropertyBinding<string, string> plainToAPropBinding = new OneWayPropertyBinding<string, string>();

plainToAPropBinding.SourceObj = sourceObj;
plainToAPropBinding.SourcePPath = new BindingPath<string>("MyStringProp");
plainToAPropBinding.TargetObj = targetObj;
plainToAPropBinding.TargetPPath = new BindingPath<string>(myAProperty);

plainToAPropBinding.Bind();

Console.Write("Testing target property change after binding operation: ");
Console.WriteLine(myAProperty.GetProperty(targetObj));

sourceObj.MyStringProp = "Hi World";
Console.Write("Testing target property change after the source property change: ");
Console.WriteLine(myAProperty.GetProperty(targetObj));

#endregion plain property to AProperty binding

#region AProperty to plain property binding

Console.WriteLine("\n\nTesting binding from AProp to plain property\n");

// reinitialize test objects
sourceObj = new MyTestDataClass();
targetObj = new MyTestDataClass();

myAProperty.SetProperty(sourceObj, "Hello World");

OneWayPropertyBinding<string, string> aPropToPlainBinding = new OneWayPropertyBinding<string, string>();
aPropToPlainBinding.SourceObj = sourceObj;
aPropToPlainBinding.SourcePPath = new BindingPath<string>(myAProperty);
aPropToPlainBinding.TargetObj = targetObj;
aPropToPlainBinding.TargetPPath = new BindingPath<string>("MyStringProp");

aPropToPlainBinding.Bind();

Console.Write("Testing target property change after binding operation: ");
Console.WriteLine(targetObj.MyStringProp);

myAProperty.SetProperty(sourceObj, "Hi World");

Console.Write("Testing target property change after the source property change: ");
Console.WriteLine(targetObj.MyStringProp);

#endregion AProperty to plain property binding
You can see that our binding functionality is, in some respect, more generic than that of WPF – indeed in WPF only Attached (or Dependency) Property can be a target of a binding, while, in our case, it can be either plain C# property or AProperty. It the future I plan to generalize it even further, allowing binding to and from WPF Attached Properties.
Attached Properties outside of WPF
April 29, 2013
Here I continue talking about re-implementing and improving WPF concepts outside of WPF and in a way that is not necessarily connected to GUI development. The first article in the series was discussing implementation of property and collection bindings outside of WPF and is available at Binding without WPF or at Codeproject: Binding without WPF. The final goal of these series is to implement most of the concepts that WPF introduced outside of WPF without dependency on any MS visual libraries and, perhaps, even in different languages, like JavaScript, Java and Objective-C.
This article discusses re-implementing WPF Attached Properties.
As a reminder – WPF Attached Properties serve the same purpose as the usual properties: they allow to get a property value from an object. They are, however, implemented very differently from the usual properties: instead of being part of the object, they are defined outside of it. If an Attached Property was set on an object, it can be retrieved from some memory store outside of the object with the object serving as a key. If an Attached Property was never defined on an object, the Attached Property’s default value will be returned. This value is defined per Attached Property and will be the same for any object.
WPF’s Attached Properties provide a number of very useful features:
- Attached Properties were used in WPF to reduce the storage required for all the numerious
WPF properties. Indeed, if an object uses default Attached Property value, it does not
require any additional storage. This type of storing property values
is called sparse storage. - WPF Attached Properties virtually allow adding new data to an object
without modifying the object’s type. - WPF Attached Properties allow setting callbacks that fire when a property
changes on an object. - In WPF only Attached (and Dependency) Properties can be a binding’s target.
(Dependency Properties are very similar to the AttachedProperties but can
only be defined within the type to which they can be attached). - Attached Properties propagate down the visual tree.
- WPF’s built-in animation framework can only animate Attached and Dependency Properties.
Here we show how to build a framework providing capabilities very similar to the WPF Attached Properties. In order to differentiate between the WPF Attached Properties and this framework’s properties I call them AProperties or AProps. Here are the AProps capabilties that match those of the Attached Properties:
- AProps provide sparse storage.
- AProps allow to add external data to the objects without changing
the objects’ type or class. - AProps allow to add a callback to be fired when a value changes on an object.
On top of the features above that are also available for the WPF attached properties it will also provide the following nice features:
- AProps can be attached to a C# entity of any type, not only to those descended from
DependencyObject. - Unlike WPF Attached Properties, the mechanism of operating with AProps is strongly typed.
- In WPF one can specify an Attached Propertie’s callback when it is created or registered. This callback fires after an object’s property changes and it is the same for any object that has the Attached Property. AProps allow to specify also a callback to be fired before a property is changed on an object. If this callback returns
false, the property changed is cancelled. Moreover, the framework allows adding callback to the individual objects. This callbacks are fired on when the AProperty is changed on the object to which the callback was added. Other objects are not affected by the callback. - Unlike Attached Properties, AProps do not have to be defined as static variables (even though they can be defined static).
Now I would like to list the functionality that the Attached Properties have, but AProps (at this point yet) do not.
- The binding framework from the previous article is not made to bind to or from AProps. Even though this functionality is coming soon.
- Attached Properties change the property value within UI thread, while the AProps change in the thread of the caller. Perhaps, at some point, I’ll add another degree of freedom to the AProps that would allow to specify property change thread.
- There is no (yet) visual framework built around AProps, so there is no propagation down the visual tree or animation classes that use AProps.
- There is no value coercion mechanism for AProps (which anyways not used very frequently in WPF).
The AProps code together with the test project that shows how to use them is can be downloade from APropsCode.zip.
The main (virtually the only) class for dealing with AProps is AProperty under NP.AProps project.
It provides a functionality for creating AProperty object. AProperty contains a Dictionary (map) that maps the objects to their property values, or rather to some entities that contain their corresponding property values. If the object does not exist in the Dictionary, the default value gets returns as its AProperty value.
The central public methods of AProperty class are the following:
public PropertyType GetProperty(ObjectType obj)
Given an object returns itsAPropertyvalue.
public void SetProperty(ObjectType obj, PropertyType newPropertyValue)
SetsAPropertyvalue on the passed object.-
public void AddOnPropertyChangedHandler
(
    ObjectType obj,
    OnPropertyChangedDelegate propChangedHandler
)
Adds object’s individual property change handler (other objects won’t be affected by it).
-
public void RemoveOnPropertyChangedHandler
(
    ObjectType obj,
    OnPropertyChangedDelegate propChangedHandler
)
Removes object’s individual property change handler.
public void ClearAProperty(ObjectType obj)
Clears AProperty value from the object (essentially removes the object from theAProperty‘sDictionary.
The constructor of AProperty class has the following signature:
public AProperty
(
    PropertyType defaultValue = default(PropertyType),
    Func beforePropertyChangedFn = null,
    OnPropertyChangedDelegate  onPropertyChangedFn = null
)
As you can see, it allows to pass the default value of the AProperty and two delegates: beforePropertyChangedFn and onPropertyChangedFn. The first of the delegates executes before AProperty changes on some object. If it returns false the property change is cancelled. The second delegate executes after the property change. Unlike individual object property change handlers these delegates execute for any object whose corresponding AProperty changes. The provided API does not allow modifying these delegate once they were set; otherwise all the objects that had their corresponding AProperty set might be affected. The OnPropertyChangedFn delegate is similar to OnPropertyChanged delegate that can be passed to the Attached Property’s metadata as the second argument.
The code that shows how to use AProperty API is under APropertyTest project. MyTestClass is a class with one property Name of type string. We want to add some integer index to MyTestClass object by using AProperty functionality.
Here is how we create indexAProperty object:
AProperty<MyTestClass, int> indexAProperty = new AProperty
(
    -1, // default indexAProperty value
    null, // no function is called before the property is set.
    (obj, oldVal, newVal) =>// to be called after the property is set
    {
        Console.WriteLine("This is a generic (not individual) property change event handler, oldValue: {0}, newValue: {1}", oldVal, newVal);
    }
);
We set the default value for indexAProperty to -1, the generic delegate to fire before the property change is not set (null), and the generic post-property-change delegate prints a message with old and new value.
After that, we create a list of MyTestClass object and populate it with 3 objects. The indexAProperty for those 3 objects is set from is set to 1, 2 and 3 correspondingly. The object with index 2 is assigned an individual property change event handler:
// list to populate with objects
List myTestObjList = new List();

for (int i = 1; i < 4; i++)
{
    // create the object
    MyTestClass myTestObj = new MyTestClass { Name = "Obj " + i };

    // set an individual property change event handler for the second object
    if (i == 2)
    {
        indexAProperty.AddOnPropertyChangedHandler
        (
            myTestObj,
            (obj, oldVal, newVal) => // individual object delegate
            {
                Console.WriteLine("This is individual property change event handler, oldValue: {0}, newValue: {1}", oldVal, newVal);
            }
        );
    }

    // add an object to the list
    myTestObjList.Add(myTestObj);

    // set the indexAProperty on the myTestObj object to i
    indexAProperty.SetProperty(myTestObj, i);
}
Finally we iterate through the list of objects an print the indexAProperty value for each of the objects:
// print indexAProperty values for every object in the list
foreach (MyTestClass myTestObj in myTestObjList)
{
    int objNumber = indexAProperty.GetProperty(myTestObj);

    Console.WriteLine(objNumber);
}
